WHAT'S NEW?
Loading...


 PmdgSim App provides you with all Boeing 737NG Series (800,900,BBJ2,BBJ3) checklists and procedures. Procedures will provide you with exactly what you need to fly the aircraft from cold and dark state to shutdown and secure, it also contains additional hints and information, and checklists will help you to make sure you didn't forget any mandatory task to prevent any prospective failure during flight.


Procedures provided in the app are :

• Preflight & Aft Overhead
• Overhead Preparation
• Forward Panel & Pedestal
• Before Pushback / Ready For Pushback
• Engine Start
• After Engine Start
• Taxi
• Cleared Into Position
• Takeoff
• After Takeoff
• Climb
• Cruise
• Initial Descent
• Final Approach / Landing
• After Landing / Taxi
• Shutdown / Secure

Checklists provided in the app are :

• Preflight
• Before Start
• Before Taxi
• Before Takeoff
• After Takeoff
• Descent
• Approach
• Landing
• Shutdown
• Secure

The app also has a Night Mode to reduce the brightness of your screen and ensure your eyes don't hurt, so it's very convenient for you during the night.


Those procedures were designed for PMDG 737 NGX and iFly 737NG, but you can use it with other aircraft. 


Download link :

Enjoy Flying as a real pilot, and have a nice flight :)


PmdgSim App is considered to use only for Flight Simulator. Do Not Use It For Real Flight.


    I always have wondered about that small surface in the trailing edge of the elevator, at the beginning, I thought it's for stabilizer trimming, but later on, it dawned on me that it was made for another purpose, and it's called balance tabs.

Balance tabs was made to assist in moving the elevator, so the loads on the control column (Yoke) are significantly reduced, which makes the airplane easier to fly.    

When the control is given an input, like when the pilot pull or push the control column, the trailing edge of the balance tab is deflected in the opposite direction of the trailing edge of the elevator. Here is an animated photo illustrating the deflection :


This action creates a small aerodynamic force, which acts in the opposite direction to the main aerodynamic force created by the elevator, and this results in a reduction in control effectiveness, as the tab force is opposite to the control force. So now maybe you're thinking why somebody wants to reduce the control forces required to move the elevator, in fact, it's very effective in critical situations such as hydraulic systems failure, because it will help the pilot for better manual controlling, since it will reduce the loads applied on the control column.  


OK that's it, that's why Boeing use the balance tabs on their 737 airplane, I hope this post was helpful, so if you found it interesting please share it with your friends via your Facebook, twitter or google+ to help the others figure out the role of balance tabs. if you have any question, don't hesitate, just leave a comment bellow, I will be glad to help you :) 
You wanna receive more interesting subjects from Learn To Fly website, follow our Facebook page and/or subscribe via your email to get the latest posts.  Have a nice flight, see ya ;)  


engine fire


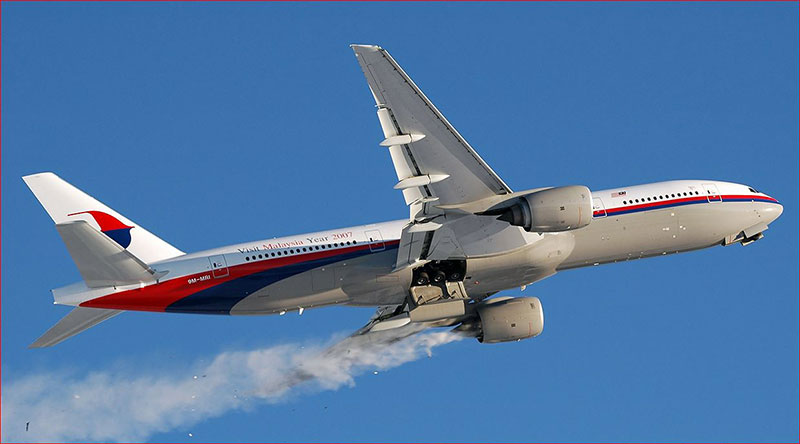
    When you watch a TV show about air crash, you get excited to simulate those non-normal situations to see if you can land the airplane or not, but the default failures menu on FSX isn't very accurate, in fact, you can't simulate very precise failures, it's more general. Anyway, PMDG provides very interesting simulation of failures, which covers almost systems of aircraft, such as APU, Engines, Fire protection, Hydraulics, Pressurization and so many other systems, so let's figure out how can we program these failures.

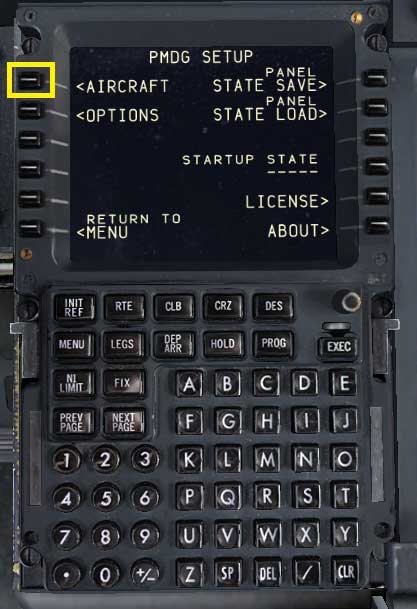
1. Go to the home CDU menu by clicking on MENU button, then select PMDG SETUP option on the right side of CDU. 

fmc cdu step 1


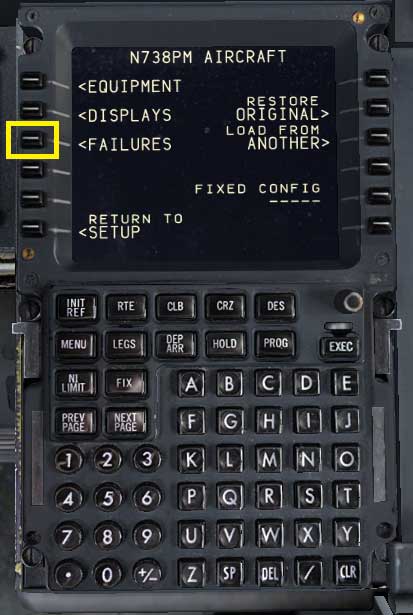
2. Select AIRCRAFT option on the left side. 

fmc cdu step 2


3. Select FAILURES option.

fmc cdu step 3


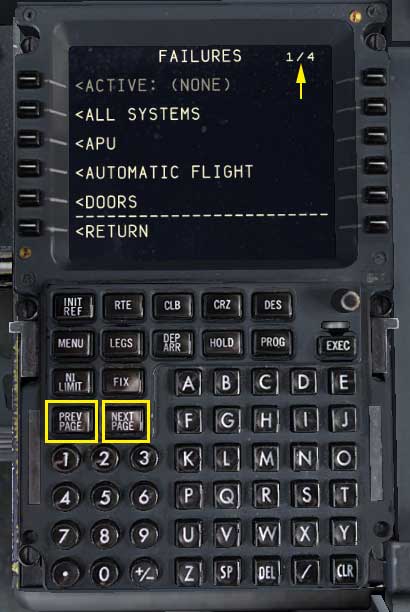
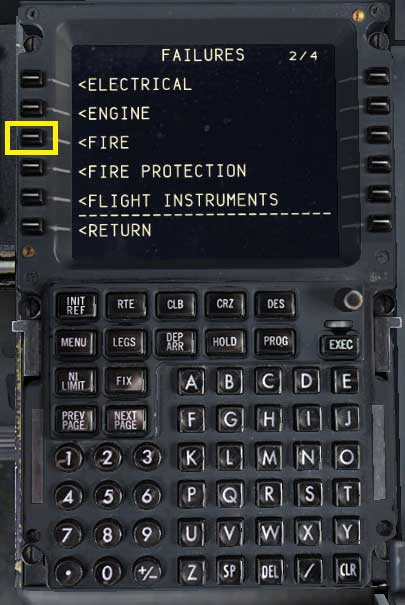
4. You can explore the various failures by browsing the failures pages as indicated in the top right corner of the cdu, press PREV PAGE or NEXT PAGE buttons to navigate through the four pages. Now, go to the second page by pressing NEXT PAGE button, we will simulate an engine fire ;)

fmc cdu step 4


5.  Press FIRE option. 

fmc cdu step


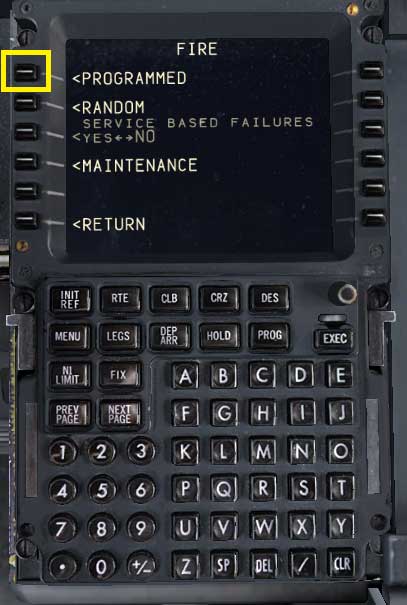
6. As you can see, there are 3 options, PROGRAMMED, to program the failure and set the desired time to trigger the failure, RANDOM to let the computer trigger the failure randomly or based on aircraft service by selecting YES in SERVICE BASED FAILURES, which is the most realistic option, since the pilot cannot predict when the failure will occur :) finally, MAINTENANCE to maintain or clear the failure. Anyway, select PROGRAMMED to see how does it work. 

fmc cdu step 6


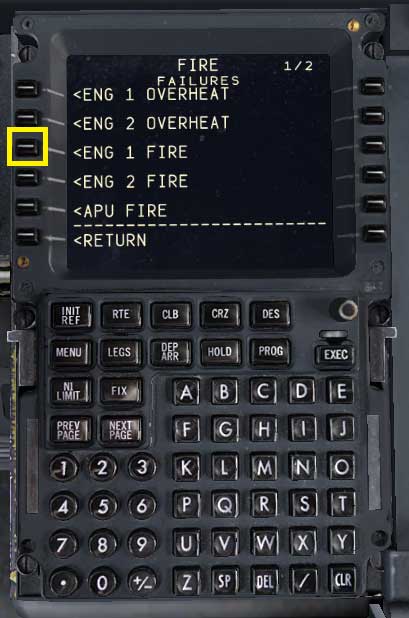
7. You can select the specific desired failure that you want to simulate. OK let's select ENG 1 FIRE failure. 

fmc cdu step 7


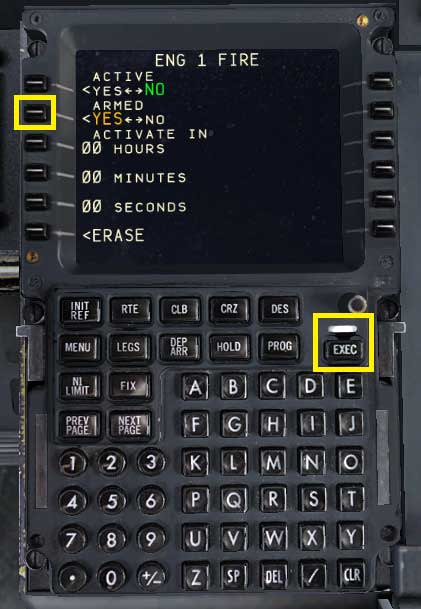
8. There are two options, the first is ACTIVATE, which activates the failure instantly, then ARMED to arm the failure and trigger it after a specific duration which you can determine by setting the desired seconds, minutes and hours. after you program your desired option press EXEC button to execute the failure.

fmc cdu step 8


OK that's it, you can now simulate different failures as desired, if this post was helpful, please share it with your friends via your facebook, twitter or google+ to help the others figure out how to simulate failures for more realistic flying. if you have any question, don't hesitate, just leave a comment bellow, I will be glad to help you :) 
you wanna receive more interesting subjects from Learn To Fly website, subscribe to get the latest posts. Have a nice flight, see ya ;)  
    
AutoBrake RTO

   
    Before every takeoff, pilots set the AutoBrake to RTO mode, RTO stands for Rejected Take Off or aborted takeoff, which is the situation where the pilots decide to abort the takeoff due to a technical failure such as an engine failure.
A rejected takeoff is performed only if the airplane's speed is below the takeoff decision speed known as V1, because over V1 the airplane may overshoot the runway, if the failure detected after the takeoff decision speed and the airplane still able to fly, the takeoff is continued and the pilots will attempt to land the airplane as soon as possible. When a failure occurred below V1, the pilot set the throttle to idle, and the autobrake system automatically apply maximum brakes to stop the airplane.    

Practice:

1. Line up with the runway for takeoff, make sure you set the autobrake to RTO position.


2. Apply takeoff thrust by advancing the thrust levers to just above idle (40% N1). Allow the engines to stabilize momentarily then promptly advance the thrust levers to takeoff thrust.


3. Be ready for any technical failure before reaching V1 speed.


4. If an engine fire occurred which is the case here, simultaneously close the thrust levers (the autobrake system will automatically apply maximum brakes), disengage the autothrottles, and Raise SPEED BRAKE lever.


6. Apply maximum reverse thrust consistent with conditions. Continue maximum braking until the airplane will stop on the runway.


7. When the airplane is stopped, perform procedures as required.


OK that's it, if this post was helpful, please share it with your friends via your facebook, twitter or google+ to help the others figure out why do they have to set autobrake to RTO mode before takeoff. if you have any question, don't hesitate, just leave a comment bellow, I will be glad to help you :) 
you wanna receive more interesting subjects from Learn To Fly website, subscribe to get the latest posts. Have a nice flight, see ya ;)